

The WooCommerce Button feature allows you to add a WhatsApp chat button directly to your WooCommerce product pages. This makes it easy for customers to ask questions about a product, pricing, stock, or variations — instantly via WhatsApp.
All settings are available under: Chat Help → WooCommerce Button
Product Page Button Settings #
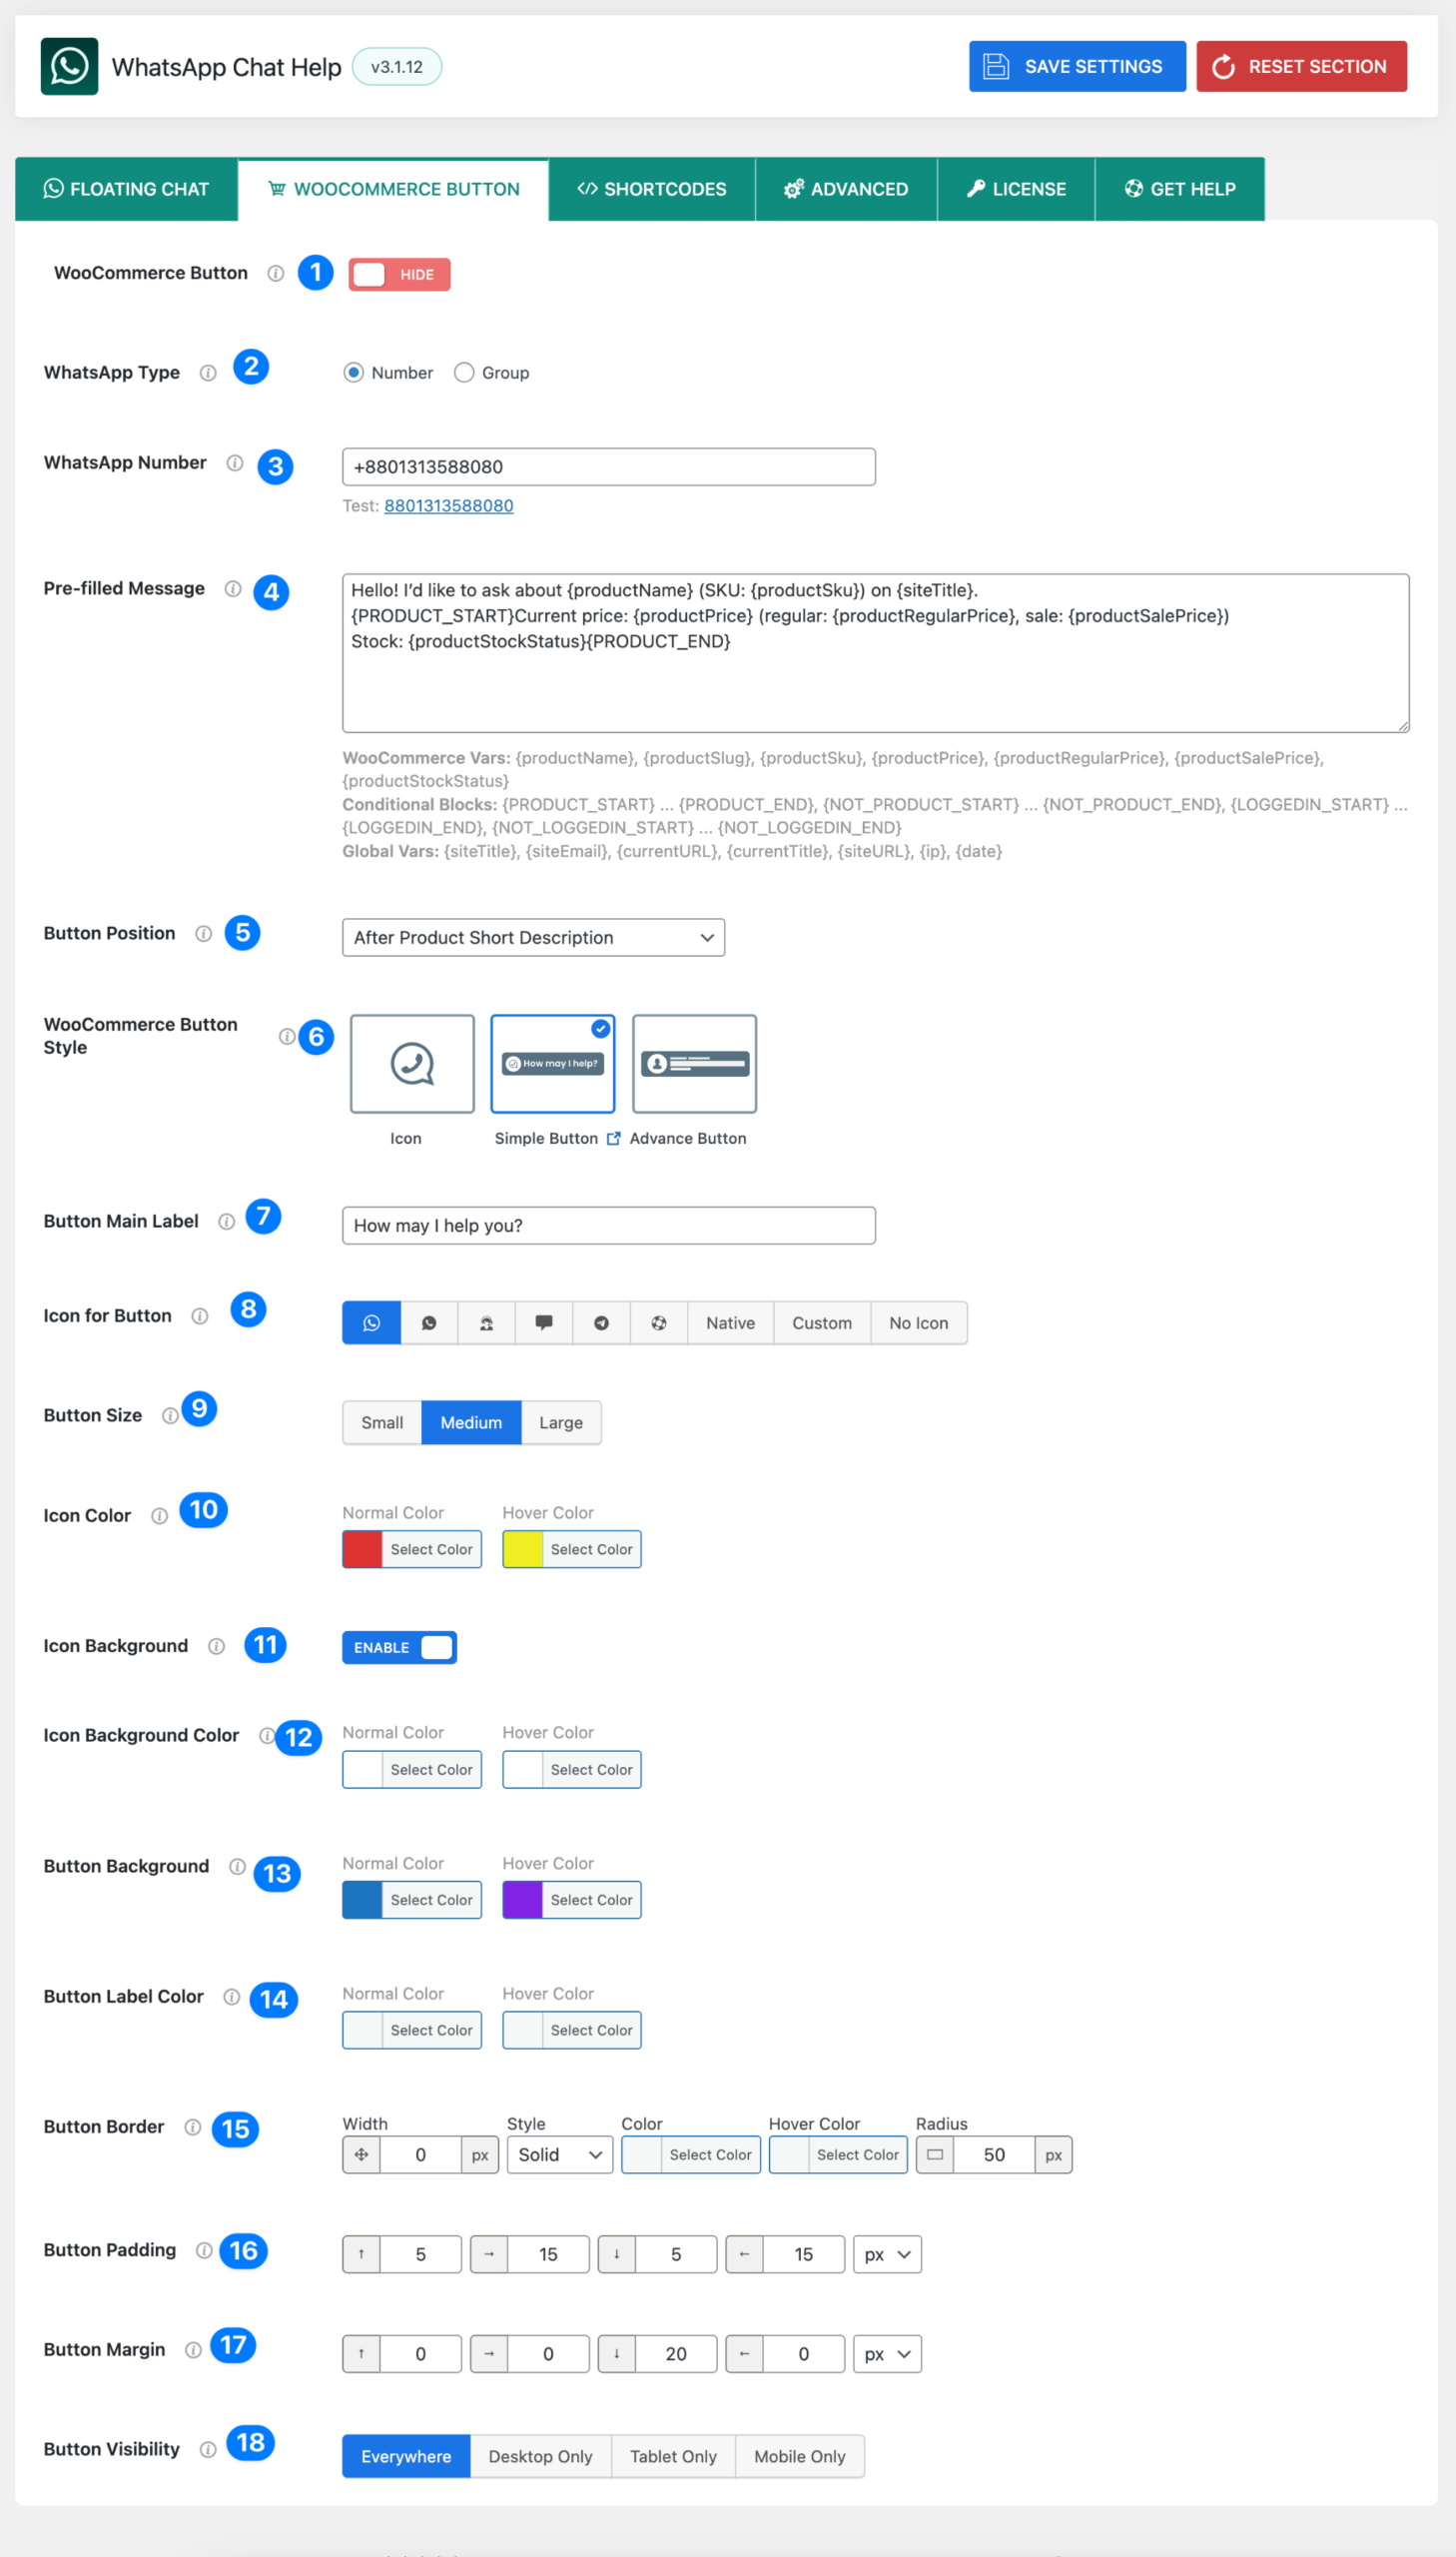
- WooCommerce Button (Enable / Disable) – Enable or disable the WhatsApp button on WooCommerce product pages.
- Enabled → The button appears based on your selected position and settings
- Disabled → The button is hidden on all product pages
- WhatsApp Type
- Choose how users will connect when clicking the button:
- Number → Start a direct chat with a WhatsApp phone number
- Group → Redirect users to a WhatsApp group invite link
- Choose how users will connect when clicking the button:
- WhatsApp Number / Group Link
- If Number is selected, enter your WhatsApp phone number in international format e.g.,
+10123456789. - If Group is selected, paste the full WhatsApp group invite URL
A test link is shown below the field to verify correctness.
- If Number is selected, enter your WhatsApp phone number in international format e.g.,
- Pre-filled Message – Define the message that is automatically inserted into WhatsApp when a customer clicks the button.
- Customize the message that will be auto-filled when a customer clicks the button.
- You can use dynamic WooCommerce variables to personalize messages, such as:
{productName},{productSku},{productPrice},{productSalePrice},{productStockStatus}- Conditional blocks:
{PRODUCT_START}...{PRODUCT_END} - Global vars:
{siteTitle},{siteEmail},{currentURL},{date},{ip}
- Example:
Hello! I’d like to ask about {productName} (SKU: {productSku}) on {siteTitle}. Current price: {productPrice} Stock: {productStockStatus} - Global variables:
{siteTitle},{siteEmail},{currentURL},{currentTitle},{date},{ip}
- Button Position: Choose where the WhatsApp button appears on the single product page.
| Position | Description |
|---|---|
| Before Main Content | Inserts the button at the very top of the product page content. |
| Before Product | Places the button before the entire product wrapper. Useful for global notices or CTA positioning. |
| Product Summary | Places the button within the main summary block (usually near the title, price, and add-to-cart area). |
| Before Add to Cart Form | Inserts the button just before the <form> element that contains the add-to-cart section. Ideal for highlighting contact before purchase. |
| Before Cart Button | Places the button right before the “Add to Cart” button. Perfect for pre-sale conversations. |
| After Cart Button | Displays the button immediately after the “Add to Cart” button. Great for post-purchase questions. |
| After Add to Cart Form | Adds the button after the entire cart form block. Keeps the chat CTA visible but less intrusive. |
| After Product | Renders the button after the entire product block. Suitable for long-form content pages. |
| After Product Summary | Inserts the button after the product summary section. A good spot for low-friction chat engagement. |
Note: Placement support may vary depending on your WooCommerce theme structure. You can test different positions to see which aligns best with your design.
- WooCommerce Button Style – Choose the visual style of the button:
- Icon – Circular WhatsApp icon only
- Simple Button – Icon + text label
- Advanced Button – Agent-style button with richer UI
- Button Main Label
- Customize the text shown inside the button.
- Example:
"How may I help you?"
- Icon for Button
- Choose an icon for the button.
- Options: WhatsApp default icon, Native icons, Custom icons Or No Icon.
- Button Size – Control the overall button size:
- Choose an icon size from Small, Medium, or Large.
- Icon Color – Set the icon color for: normal state, hover state.
- Icon Background (Enable / Disable) – Enable or disable a background behind the icon.
- Icon Background Color – Select background colors for the icon: Normal & Hover.
- Button Background – Set the button’s background color: Normal & Hover.
- Button Label Color – Control the text color for: Normal & Hover.
- Button Border – Customize the button border: width, style, color, hover color, border radius.
- Button Padding – Adjust inner spacing (top, right, bottom, left) in pixels to fine-tune button size.
- Button Margin
- Set the margin (outside spacing) around the button.
- Input values for Top, Right, Bottom, Left in pixels.
- Button Visibility: Choose where the WooCommerce button will be displayed based on device type:
- Everywhere → Visible on all devices (desktop, tablet, and mobile).
- Desktop Only → Button is shown only on desktop screens.
- Tablet Only → Button is shown only on tablets.
- Mobile Only → Button is shown only on mobile devices.
WooCommerce Button Dynamic Variables #
When configuring the Pre-filled Message for your WooCommerce Button, you can use dynamic variables to automatically insert product details, site information, and conditional content. These variables are replaced in real-time with actual data when a customer clicks the button.
🛒 WooCommerce Variables #
- {productName} → Displays the product’s name.
Example: “Darkify Plugin” - {productSlug} → Inserts the product’s slug (URL-friendly name).
Example: “darkify-plugin” - {productSku} → Displays the product’s SKU (Stock Keeping Unit).
Example: “DP-2025” - {productPrice} → Shows the product’s current price (formatted with currency).
Example: “$49” - {productRegularPrice} → Displays the regular/original price.
Example: “$79” - {productSalePrice} → Displays the discounted/sale price (if applicable).
Example: “$49” - {productStockStatus} → Displays the stock availability.
Example: “In stock” / “Out of stock”
🌍 Global Variables #
These variables insert general site or session-related details.
- {siteTitle} → Site title from WordPress settings.
Example: “My WordPress Store” - {siteEmail} → Site admin email.
Example: “[email protected]” - {currentURL} → The URL of the product page where the user clicked the button.
Example: “https://myshop.com/product/darkify-plugin” - {currentTitle} → The page/post/product title.
Example: “Darkify – WordPress Dark Mode Plugin” - {date} → Current date of the chat initiation.
Example: “2025-08-28” - {ip} → Visitor’s IP address.
Example: “192.168.1.101”
🔲 Conditional Blocks #
Conditional blocks allow you to display specific sections of the message only if certain conditions are met.
- {PRODUCT_START} … {PRODUCT_END}
Wrap content that should only appear if a WooCommerce product context exists.
Example:{PRODUCT_START} Product: {productName} Price: {productPrice} {PRODUCT_END} - {LOGGEDIN_START} … {LOGGEDIN_END}
Content only shows if the user is logged in. - {NOT_LOGGEDIN_START} … {NOT_LOGGEDIN_END}
Content only shows if the user is not logged in.
✅ Example Pre-filled Message Using Variables
Hello! I’d like to ask about {productName} (SKU: {productSku}) on {siteTitle}.
{PRODUCT_START}
Price: {productPrice} (Regular: {productRegularPrice}, Sale: {productSalePrice})
Stock: {productStockStatus}
{PRODUCT_END}
Page: {currentURL}
Date: {date}
IP: {ip}
Customer sees something like:
Hello! I’d like to ask about Darkify Plugin (SKU: DP-2025) on My WordPress Store.
Price: $49 (Regular: $79, Sale: $49)
Stock: In stock
Page: https://myshop.com/product/darkify-plugin
Date: 2025-08-28
IP: 192.168.1.101


