

The Multi-Agent List layout allows you to display multiple support agents in a list view inside the chat bubble. Visitors can choose which agent they want to connect with, making it perfect for businesses with multiple departments or team members.
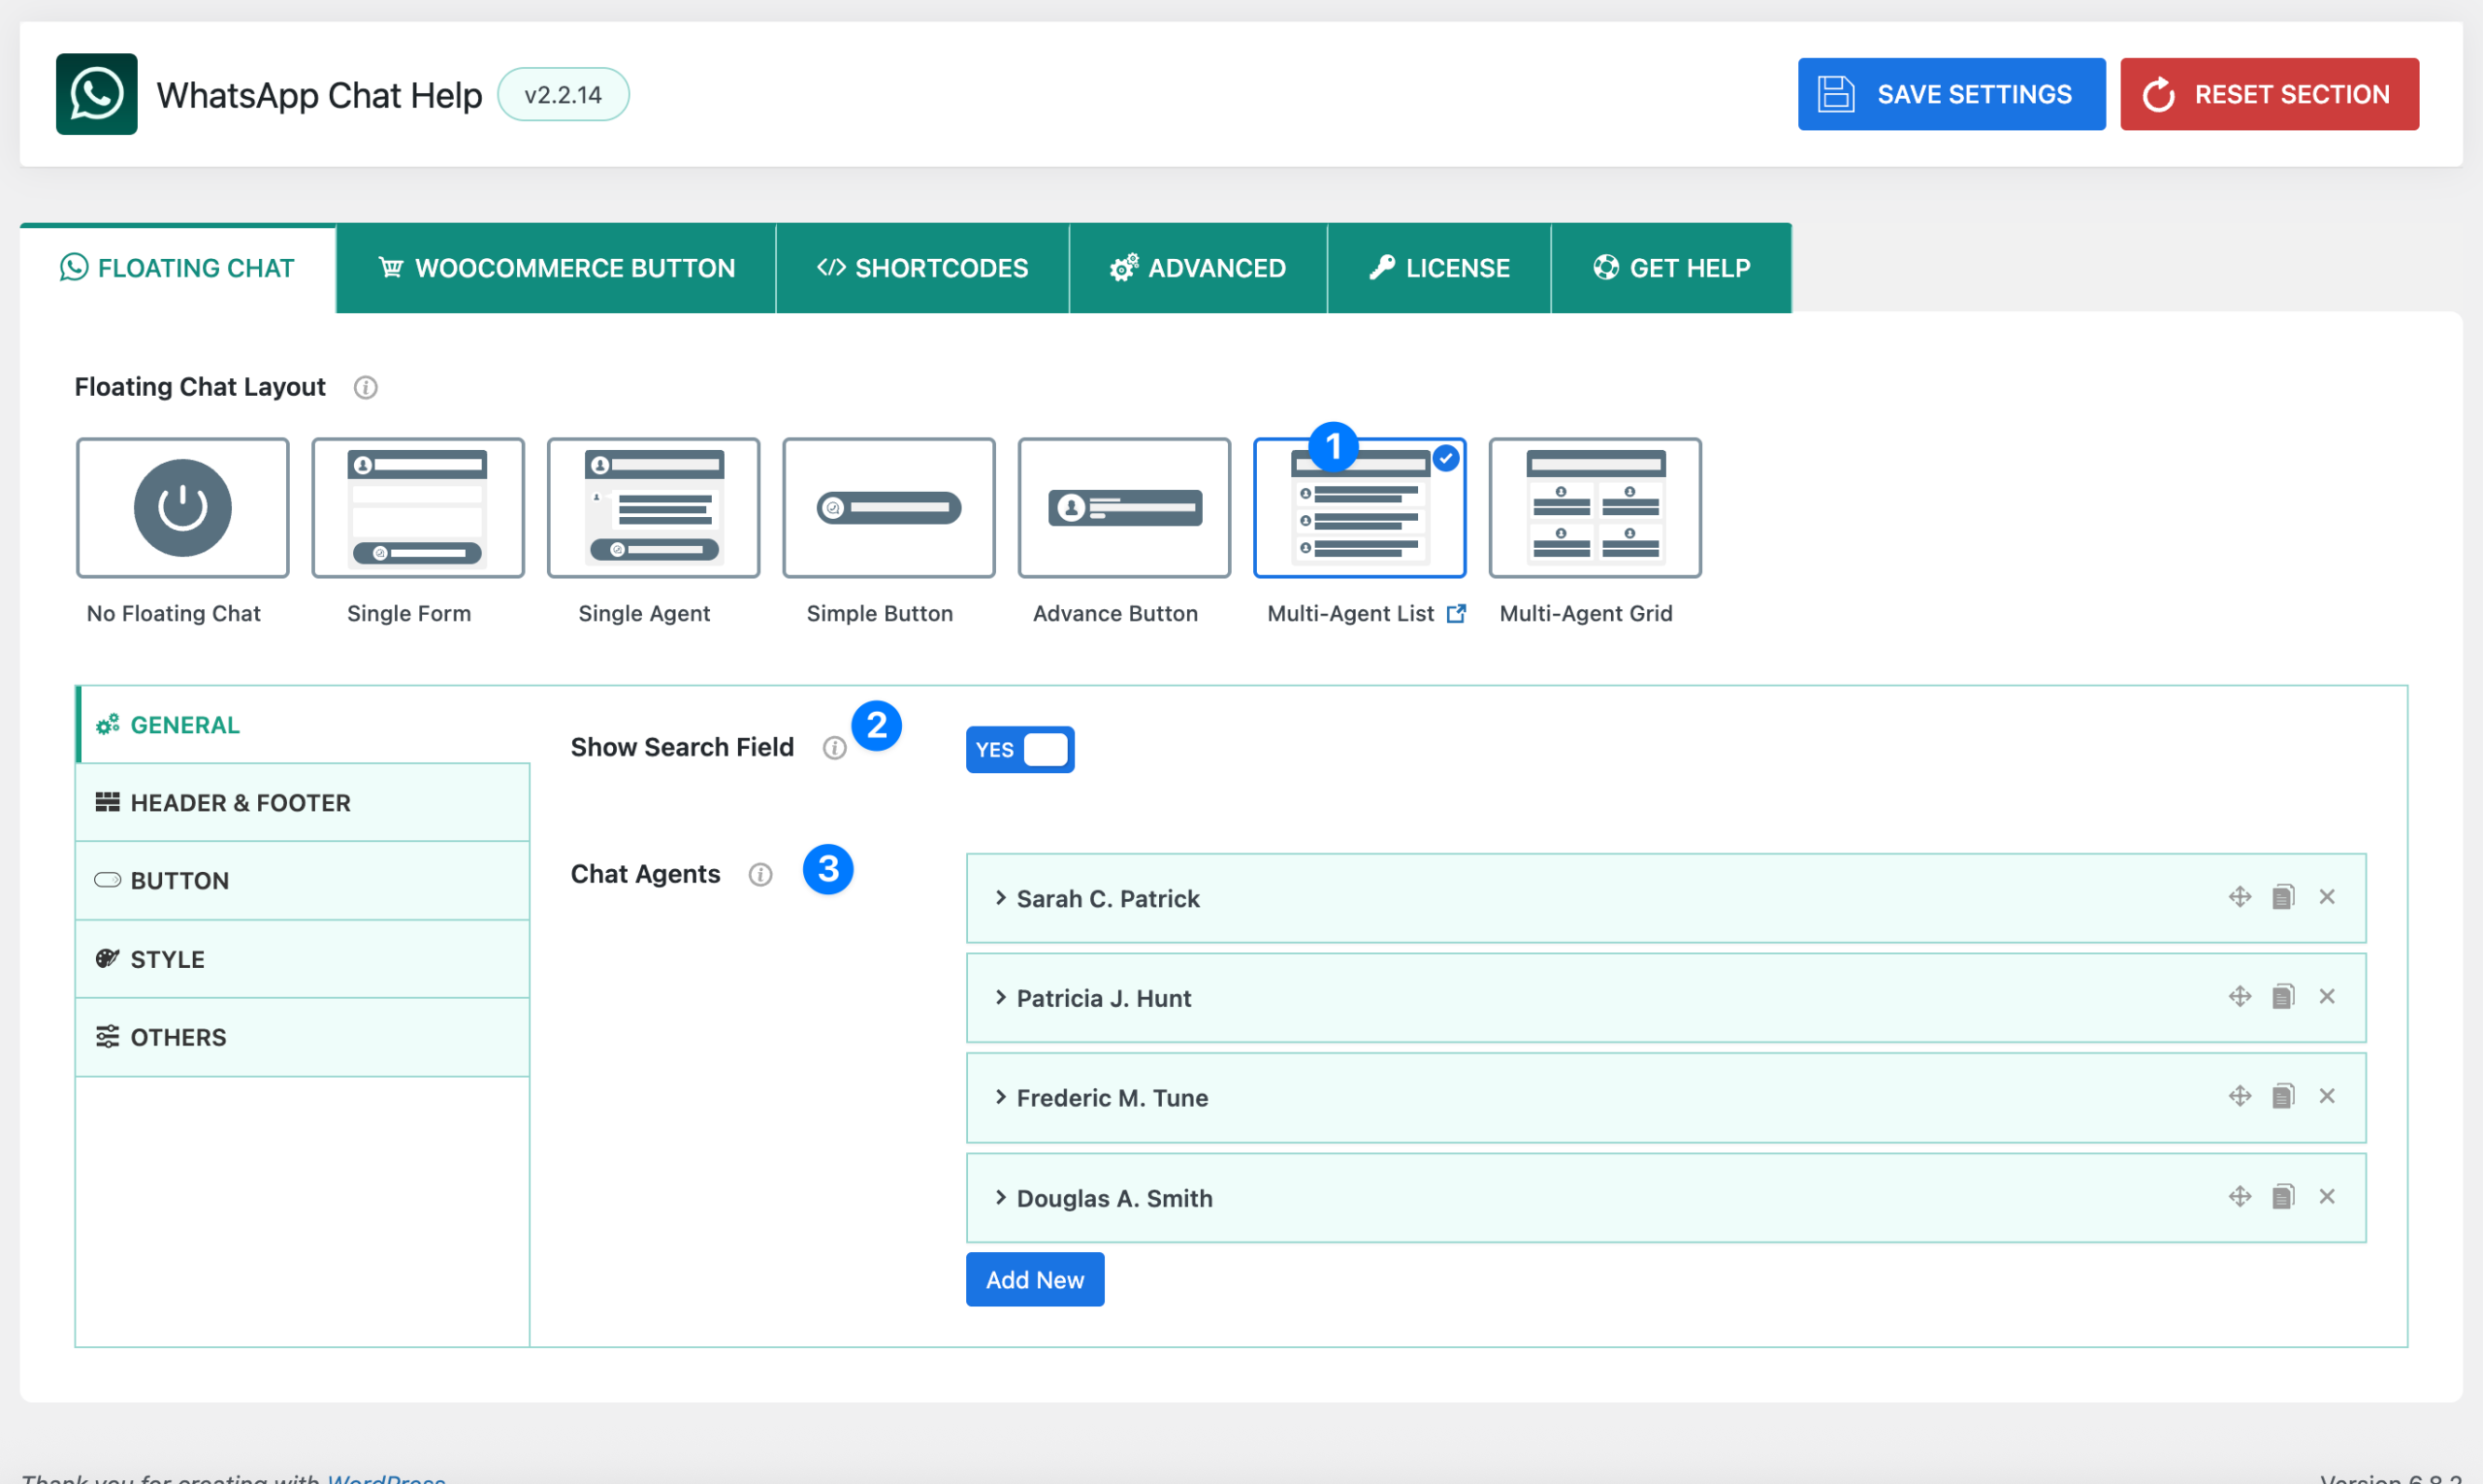
- Layout Selector – Multi-Agent List: Choose the Multi-Agent List layout from the Floating Chat Layout options. This layout displays agents in a vertical list format, showing their names (and optionally photos, designations, and statuses).
- Show Search Field:
- Toggle ON → Adds a search bar at the top of the agent list, allowing visitors to quickly find a specific agent by name.
- Toggle OFF → Hides the search field; users will see only the list of available agents.
This is useful if you have a long list of agents and want to improve navigation.
- Chat Agents: This section allows you to add, edit, and manage multiple agents.
- Each agent can include details such as:
- Agent name
- Photo (default, custom, or none)
- Designation
- WhatsApp type (Number / Group)
- Number or group link
- Pre-filled message
- Timezone & Availability
- Custom online/offline texts
- Each agent can include details such as:
👉 You can add as many agents as needed by clicking Add New.
Agent Settings #
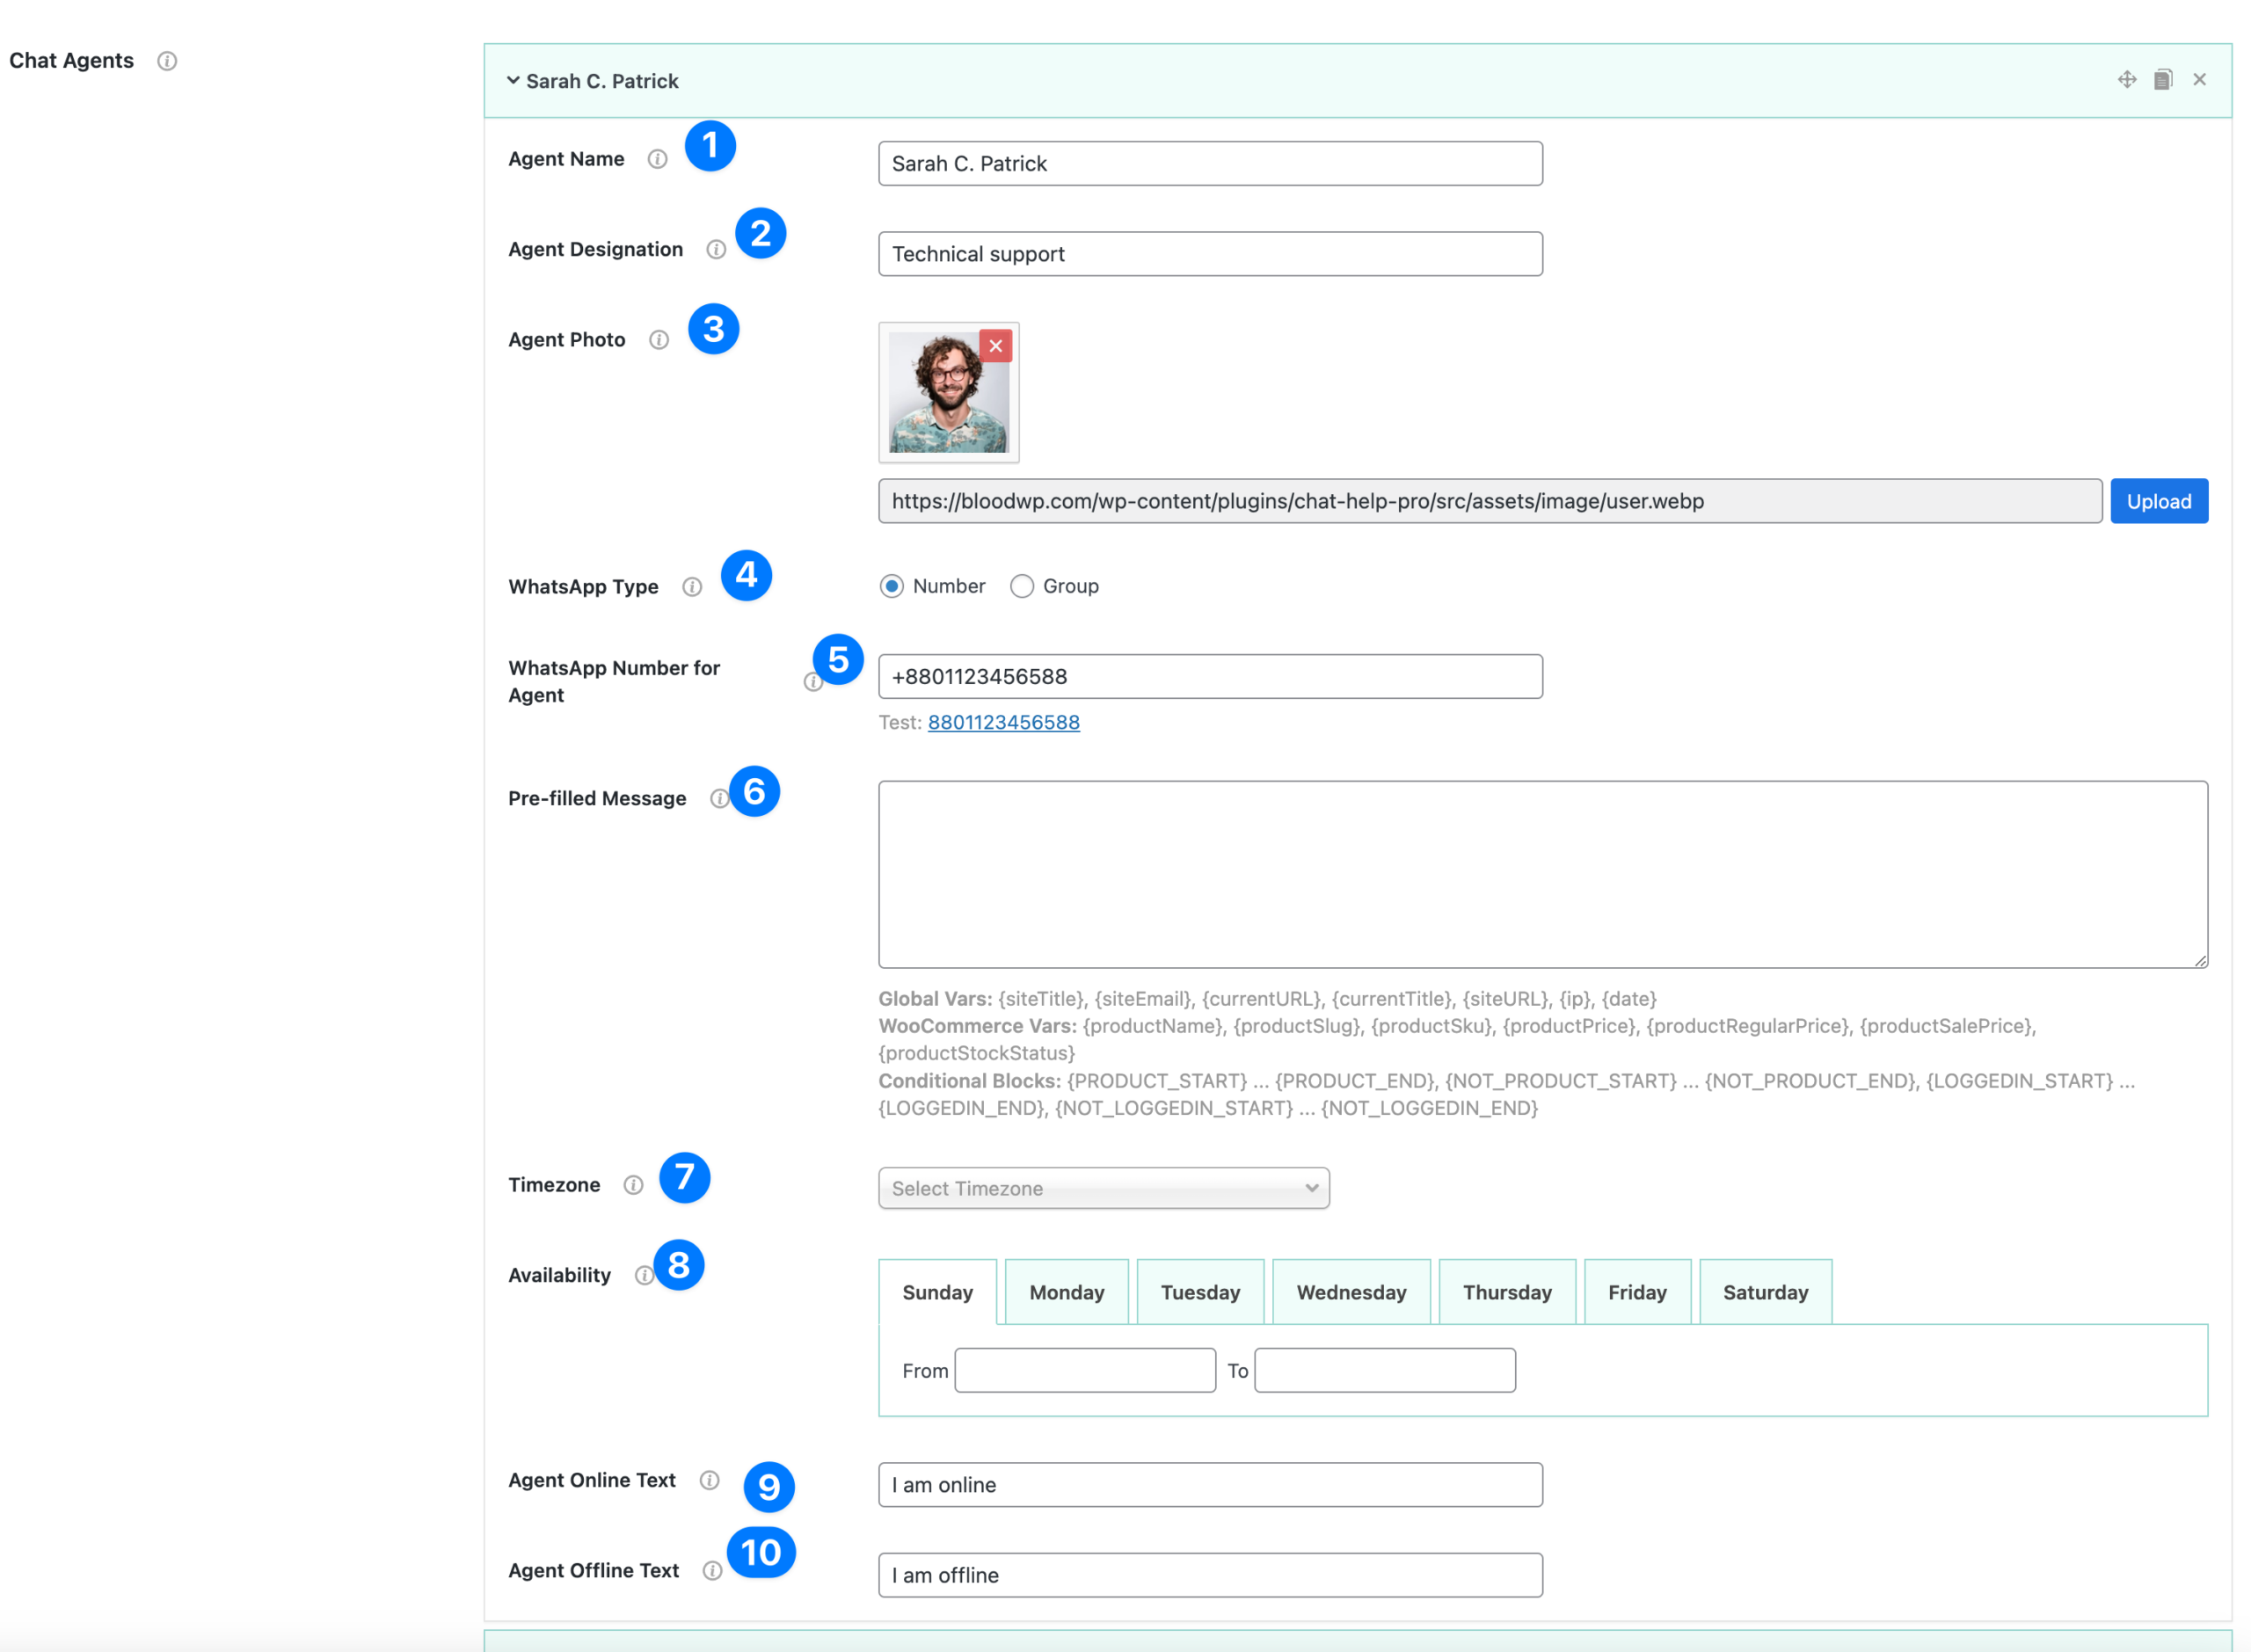
Each agent in the Chat Agents section can be customized individually with detailed settings:
- Agent Name: Enter the name of the agent (e.g., Sarah C. Patrick). This name will be shown in the chat bubble alongside the agent’s details.
- Agent Designation: Add the agent’s role or designation (e.g., Technical Support, Sales Manager, Customer Service). This helps visitors identify the right person to contact.
- Agent Photo: Upload or select an image from the media library to display as the agent’s profile photo.
- Default → Uses the plugin’s default avatar.
- Custom → Upload your own image.
- None → No image will be displayed.
- WhatsApp Type: Choose how the agent can be contacted:
- Number → Visitors send direct messages to the agent’s WhatsApp number.
- Group → Visitors can join the agent’s WhatsApp group via group link.
- WhatsApp Number (or Group Link):
- If Number is selected → Enter the WhatsApp number in international format (e.g., +8801123456588).
- If Group is selected → Enter the WhatsApp group invite link.
- Pre-filled Message: Define a default message that will appear when a visitor clicks to chat with this agent.
- Example: “Hello! I’d like to ask about {productName}.”
- Supports variables and conditional blocks for personalization.
- Timezone: Select the agent’s timezone. This ensures availability settings align with the correct local time.
- Availability: Set the agent’s available hours for each day of the week.
- Example: Monday to Friday → 09:00 to 18:00
- To mark a full day as unavailable, set 00:00 to 00:00.
- Agent Online Text:
Enter the custom text that will display when the agent is available (e.g., I am online). - Agent Offline Text:
Enter the custom text that will display when the agent is offline (e.g., I am offline).
👉 Repeat this setup for as many agents as you need. Each agent can have different photos, messages, and availability to best match your support structure.
Dynamic Variables for Pre-Filled Messages #
When creating Pre-Filled Messages (for single agents, buttons, or multi-agent layouts), you can use dynamic variables to automatically insert useful details like site information, product details, or conditional content. These variables help personalize chats and save your users’ time.
Global Variables #
These work everywhere (single, multi, WooCommerce, shortcode buttons).
- {siteTitle} → Inserts your website title.
- {siteEmail} → Inserts your admin/site email address.
- {currentURL} → Inserts the current page URL.
- {currentTitle} → Inserts the title of the current page/post/product.
- {siteURL} → Inserts your site’s base URL.
- {ip} → Inserts the visitor’s IP address.
- {date} → Inserts today’s date.
Example:Hello, I am visiting {currentTitle} on {siteTitle} ({currentURL})
WooCommerce Variables #
Available only when WooCommerce is active and used on product pages.
- {productName} → Product name.
- {productSlug} → Product slug (URL-friendly name).
- {productSku} → Product SKU code.
- {productPrice} → Current product price.
- {productRegularPrice} → Product’s regular/original price.
- {productSalePrice} → Discounted sale price (if available).
- {productStockStatus} → Shows whether product is In Stock or Out of Stock.
Example:I’d like to order {productName} (SKU: {productSku}) – Current price {productPrice}
3. Conditional Blocks #
Use these to show or hide content dynamically based on conditions.
- {PRODUCT_START} … {PRODUCT_END} → Wraps WooCommerce-only content. Only displays on product pages.
- {NOT_PRODUCT_START} … {NOT_PRODUCT_END} → Wraps content that should display only on non-product pages.
- {LOGGEDIN_START} … {LOGGEDIN_END} → Wraps content shown only to logged-in users.
- {NOT_LOGGEDIN_START} … {NOT_LOGGEDIN_END} → Wraps content shown only to visitors who are not logged in.
Example:
{PRODUCT_START}
I’m interested in {productName}, price {productPrice}.
{PRODUCT_END}

{NOT_PRODUCT_START}
I have a general question about {siteTitle}.
{NOT_PRODUCT_END}
👉 Using these variables ensures your visitors’ messages are personalized, context-aware, and professional without requiring them to type everything manually.


