

Webhooks allow you to automatically send chat interaction data from WhatsApp Chat Help to external systems (like CRMs, analytics tools, or custom APIs). This is done in real-time using HTTP POST requests, so you can track conversations, trigger automations, or log chat events without manual work.
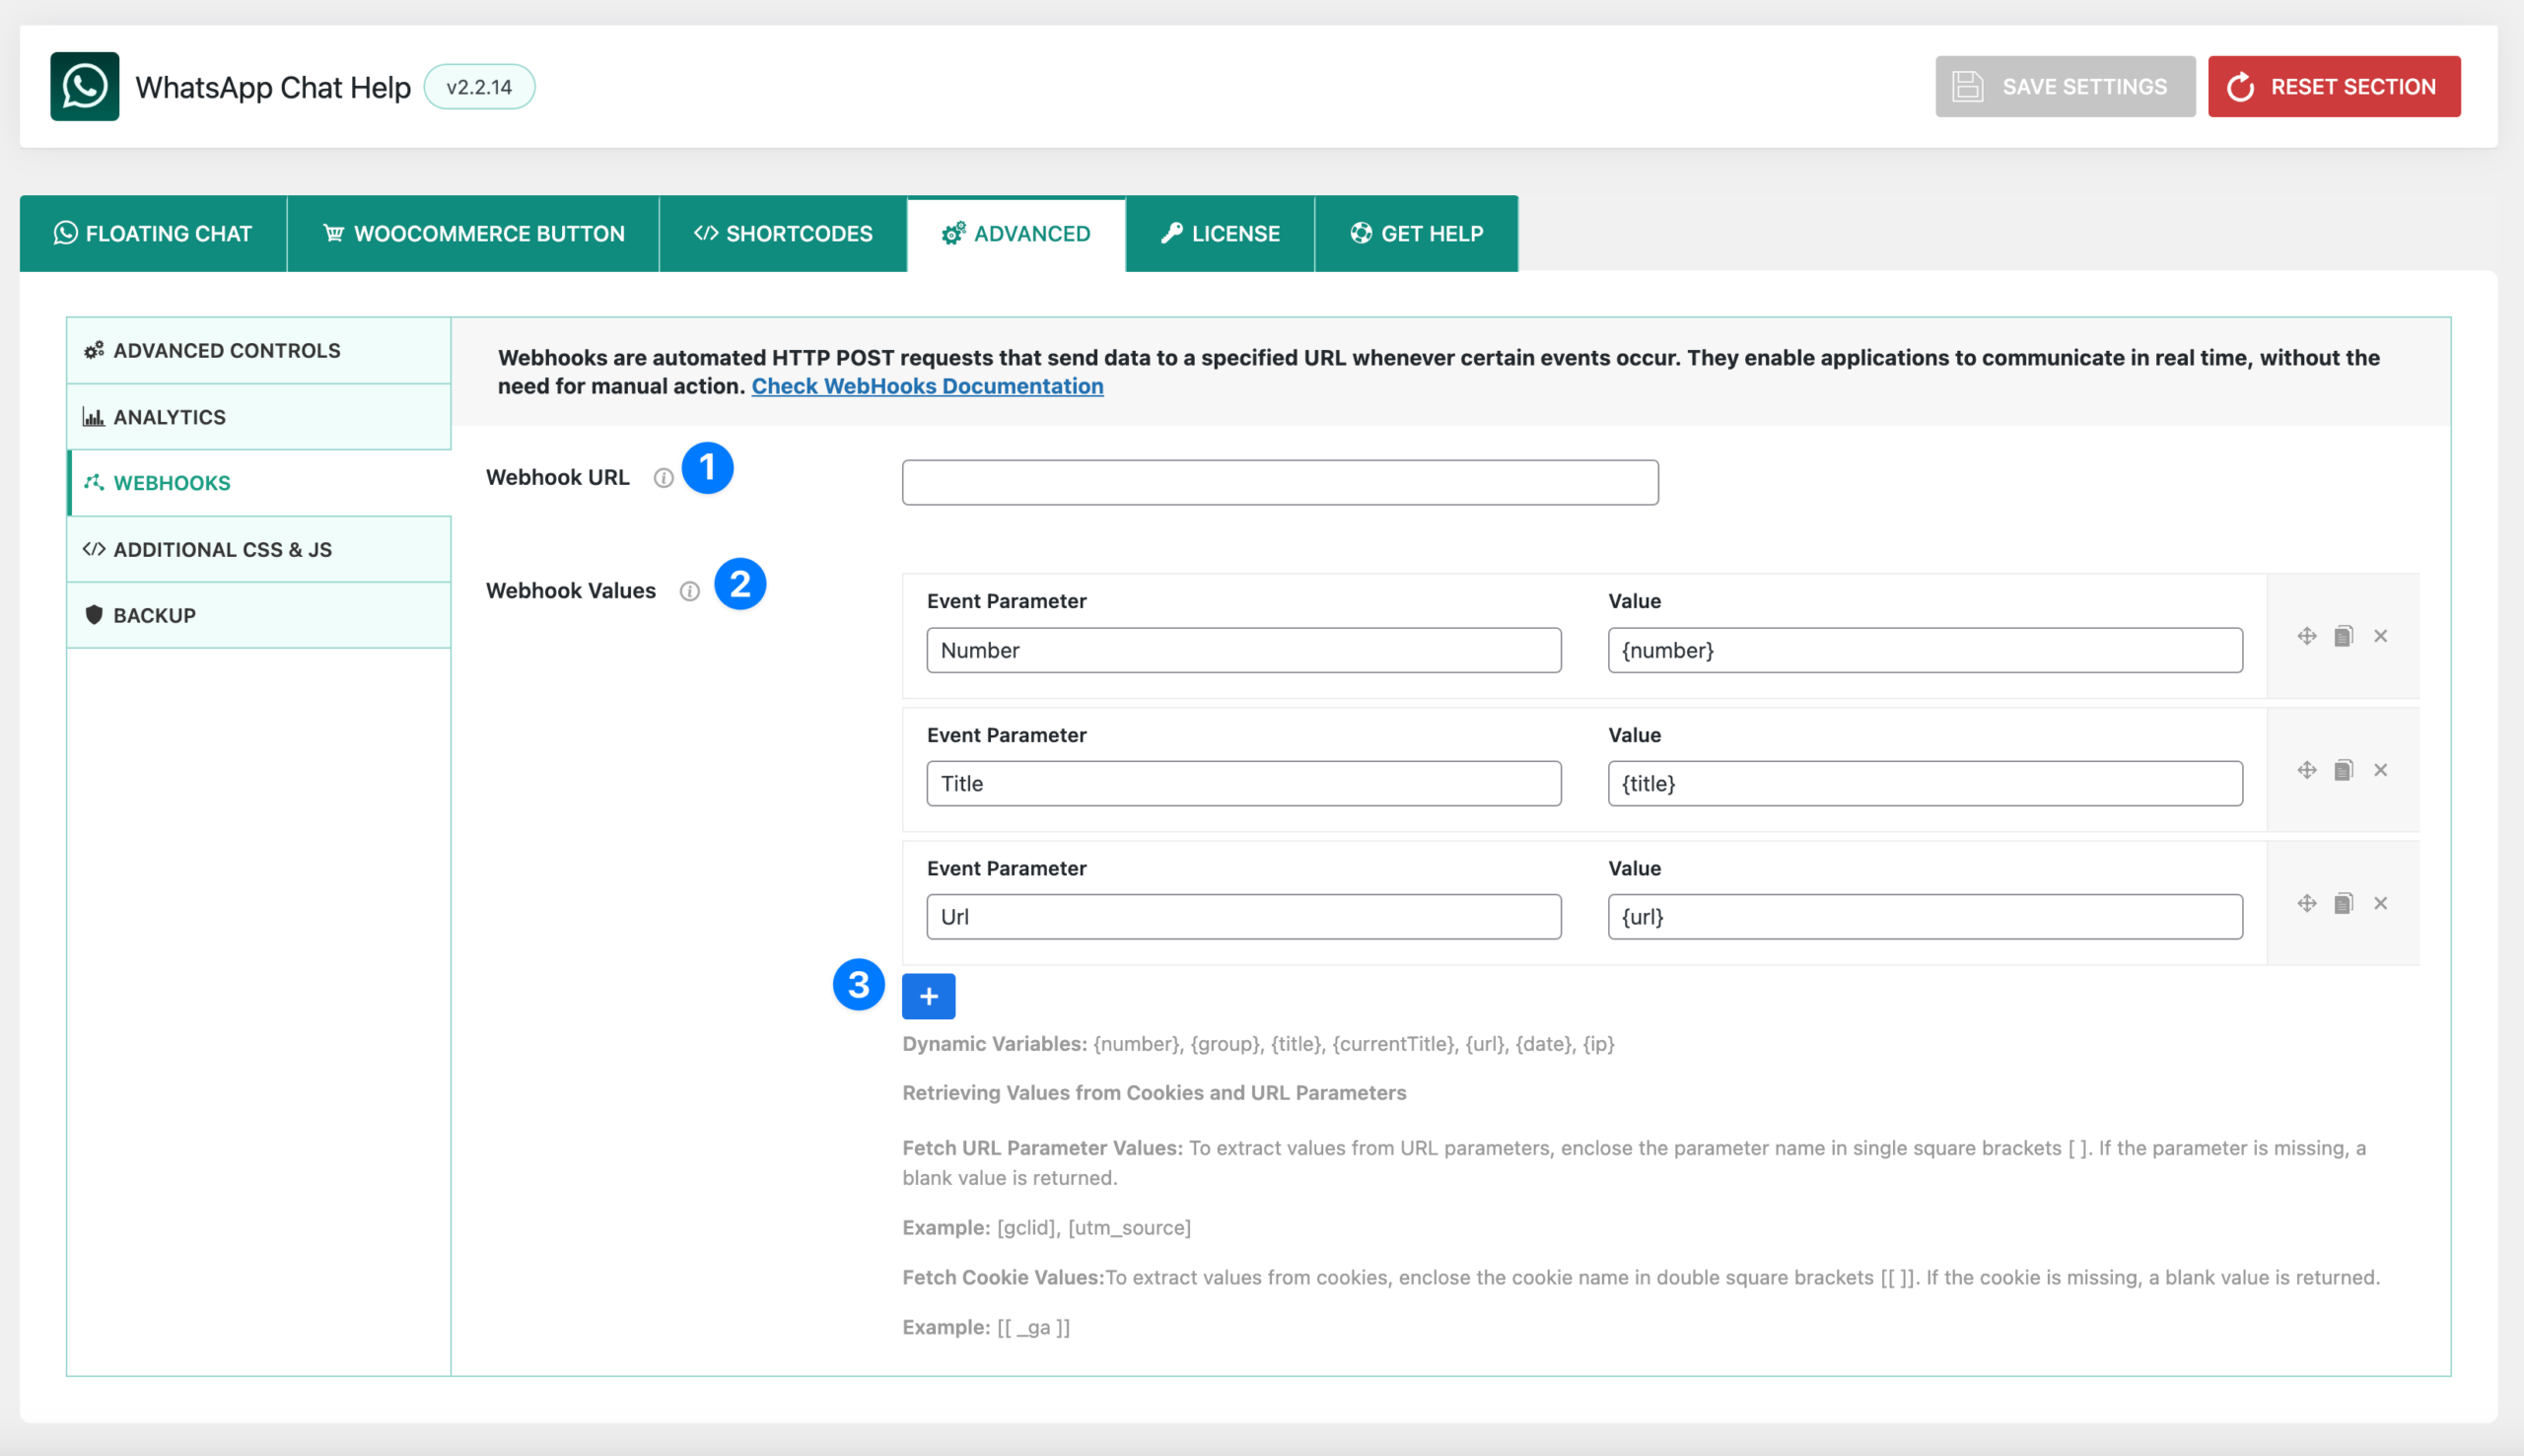
1) Webhook URL #
- Enter the destination URL where data should be sent whenever an event occurs (e.g., a user clicks the chat button).
- Example:
https://yourdomain.com/webhook-endpoint - This should be a valid endpoint capable of receiving POST requests.
2) Webhook Values #
- Define which parameters and values to send with each webhook event.
- Each value is sent as part of the payload, making it easy for your external system to capture important details.
- Example Parameters:
- Number →
{number}(WhatsApp number used for chat) - Title →
{title}(page title where chat was triggered) - URL →
{url}(page URL where chat was initiated)
- Number →
3) Adding More Parameters #
- Click the “+” button to add additional parameters.
- You can use both static values and dynamic variables.
🔑 Dynamic Variables Supported #
{number}→ WhatsApp number{group}→ WhatsApp group ID{title}→ Page title{currentTitle}→ Current post/page title{url}→ Current page URL{date}→ Current date/time{ip}→ User’s IP address
📊 Advanced Data Capture #
- URL Parameters
- Capture query string values from the URL by wrapping parameter names in square brackets
[ ]. - Example:
[utm_source],[gclid]
- Capture query string values from the URL by wrapping parameter names in square brackets
- Cookies
- Capture cookie values by wrapping cookie names in double square brackets
[[ ]]. - Example:
[[ _ga ]]
- Capture cookie values by wrapping cookie names in double square brackets
📌 Example Webhook Payload #
If a user clicks a WhatsApp button on your Pricing Page, the webhook could send:
{
  "number": "+8801123456789",
  "title": "Pricing Page",
  "url": "https://example.com/pricing",
  "utm_source": "google",
  "_ga": "GA1.1.1234567890.1693273927"
}
This payload can then be processed by your CRM, analytics system, or custom app.
Webhooks – Integration Example (Zapier / Make) #
Webhooks are powerful on their own, but when paired with automation tools like Zapier or Make (Integromat), they allow you to send WhatsApp chat events directly into CRMs, spreadsheets, email systems, or other apps without writing code.
🔧 Example: Connecting to Zapier #
Step 1: Create a New Zap #
- Log in to your Zapier account.
- Click “Create Zap”.
Step 2: Set Webhooks by Zapier as the Trigger #
- Choose Webhooks by Zapier as the Trigger App.
- Select Catch Hook as the trigger event.
- Zapier will provide a Webhook URL. Copy this URL.
Step 3: Paste Webhook URL in Plugin #
- Go to WhatsApp Chat Help → Advanced → Webhooks.
- Paste the Zapier Webhook URL in the Webhook URL field.
- Add any parameters you want to send (e.g.,
{number},{url},{title}). - Save settings.
Step 4: Test the Webhook #
- Click a WhatsApp button on your site.
- Zapier should catch the request and show sample data (e.g., the number, page title, URL, etc.).
Step 5: Add an Action in Zapier #
- Choose what happens with the data (send to Google Sheets, HubSpot, Slack, Gmail, etc.).
- For example:
- Add a new row in Google Sheets for each chat.
- Send a Slack message when a new WhatsApp inquiry is received.
- Create a new CRM lead with captured details.
⚙️ Example with Make (Integromat) #
- Go to your Make dashboard.
- Create a new Scenario.
- Add a Webhook module and generate a webhook URL.
- Copy-paste the URL into your plugin’s Webhook URL field.
- Add desired Webhook Values and save.
- Run the scenario and trigger a chat event to test.
- Connect the webhook to other modules (Google Drive, Trello, Mailchimp, etc.).
📌 Common Use Cases #
- Log every chat inquiry into Google Sheets for easy tracking.
- Send leads to HubSpot, Zoho, or Salesforce automatically.
- Notify your Slack or Microsoft Teams channel when a new user starts a chat.
- Save chat interaction data to a database or analytics system.
👉 This makes WhatsApp Chat Help not just a chat tool, but part of a larger automation workflow for sales, marketing, and support.
Zapier Recipe: Log WhatsApp Clicks to Google Sheets #
What you’ll build #
Every time someone clicks your WhatsApp button, a row is added to a Google Sheet with the key details (number/group, page title, URL, date, IP, etc.).
1) Prep your Google Sheet #
Create a sheet (e.g., “WhatsApp Leads”) with these columns in row 1:
- Timestamp
- Type (number/group)
- NumberOrGroup
- PageTitle
- PageURL
- IP
- UTM_Source (optional)
- UTM_Medium (optional)
- UTM_Campaign (optional)
You can add more columns anytime; just map them later in Zapier.
2) Configure Webhook in the Plugin #
Go to WhatsApp Chat Help → Advanced → Webhooks.
- Webhook URL: leave blank for now (Zapier will give this in step 2).
- Webhook Values: click + and add the following pairs:
| Event Parameter | Value |
|---|---|
| type | {type} |
| number | {number} |
| group | {group} |
| title | {title} |
| url | {url} |
| date | {date} |
| ip | {ip} |
| utm_source | [utm_source] |
| utm_medium | [utm_medium] |
| utm_campaign | [utm_campaign] |
Notes:
{…}are built-in variables from the plugin.[utm_*]reads values from URL parameters (blank if missing).
Click Save when done (you’ll come back to paste the URL).
3) Create the Zap Trigger (Catch Hook) #
- In Zapier, Create Zap.
- Trigger app: Webhooks by Zapier → Catch Hook.
- Zapier shows a Custom Webhook URL. Copy it.
- Go back to the plugin and paste it into Webhook URL → Save.
4) Send a Test #
From your site, click any WhatsApp button once.
Back in Zapier, click Test trigger. You should see a payload like:
type: number
number: +880123456789
group:
title: Product – Classic Tee
url: https://example.com/product/classic-tee/
date: 2025-08-29 10:22:31
ip: 203.0.113.45
utm_source: google
utm_medium: cpc
utm_campaign: summer_sale
If no data appears, click the button again or ensure the webhook URL was pasted and saved correctly.
5) Add the Action (Create Spreadsheet Row) #
- Action app: Google Sheets.
- Event: Create Spreadsheet Row.
- Pick your Drive, Spreadsheet, and Worksheet.
- Map fields:
- Timestamp →
date - Type →
type - NumberOrGroup → use
numberiftypeis number, orgroupif group
(You can map both to the same column if you just want one value.) - PageTitle →
title - PageURL →
url - IP →
ip - UTM_Source →
utm_source - UTM_Medium →
utm_medium - UTM_Campaign →
utm_campaign
- Timestamp →
Click Test action → confirm a row is added to your sheet → Publish the Zap.
(Optional) Make the “NumberOrGroup” column smart #
If you want one column that automatically chooses number or group:
- In the Google Sheets step, click the NumberOrGroup field → Open the data panel.
- Choose Custom value and set a small Zapier Formatter step before the Sheets action:
- Add Step: Formatter → Utilities → Pick from list
- Input:
number,group - Lookup Key:
type - Default: leave blank (or “unknown”)
- Then map:
- If result is
number→ use thenumberfield - If result is
group→ use thegroupfield
- If result is
(Or keep it simple and just add both number and group columns.)
Troubleshooting / Tips #
- No row appears? Check the Zap is Published, the webhook URL is correct, and you clicked a real WhatsApp button (not preview).
- Empty UTM fields? They’ll be blank unless your page URL contains those parameters.
- Date/time zone: The
{date}uses your server/app default. You can reformat with a Formatter → Date/Time step if needed. - Spam/IP privacy: IP logging may be considered personal data in some regions. Ensure your privacy policy covers this before enabling.
Make (Integromat) quick variant #
- Create a Scenario → Webhooks (Custom webhook) → copy URL into the plugin.
- Add a Google Sheets → Add a Row module.
- Map fields as above and Run once to test.
Done! #
Every WhatsApp click is now logged to your Google Sheet, complete with page context and campaign tags.


